Showing posts with label Letter Tt. Show all posts

Tuesday, April 26, 2016

Tree & Leaf Tot Trays

Tree Tot Trays

Here are my preschooler’s tray activities from our tree unit. I didn’t get too many action pictures this time. We’ve been busy trying to finish up our homeschool year strong. But I think there are enough pictures to give you a good idea of what Jet’s been up to.


IMG_4578IMG_4577

Stick Size Sorting
(Idea from here)

Another use for a pile of sticks! My 4 year old worked on some early math skills with this stick size sorting tray. I started him off with fewer sticks and added more later to increase the challenge.


IMG_4600
IMG_4634e

Leaf Rubbing Tray

Jet made leaf rubbings as long as he had paper. Having a brother or myself hold the paper down, and using triangular crayons, made this tray easier for him. I did have him do it solo a few times, but he got a little frustrated when the leaf moved around and his rubbing wasn’t perfect. We’ve done this as a group before, so my preschooler had high expectations for himself.


IMG_4592IMG_4621[1]

Button Tree Fine-Motor Activity
(Idea inspired by this blog post)

For this tray I threaded 3 pipe cleaners through an overturned colander and twisted them to make a tree onto which my little guy threaded buttons. Our tree got a bit wobbly with the weight of the buttons, so if you try this I’d recommend using a few more pipe cleaners for a stronger “trunk.”


IMG_4579

Leaf Shadow Match Puzzle

This puzzle is part of a collection of file folder games that I keep on hand. This one is from A Teaching Mommy.


IMG_4597
IMG_4632e (2)

Leaf Art Tray

This art tray was a spin-off of a book activity that I’ll post about soon. Jet was free to do whatever he wanted here and I just love the cute leaf creations he made.


IMG_4593IMG_4615[1]

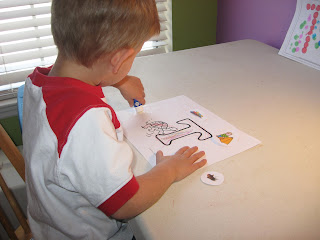
Tree Sequencing Cut & Paste Activity

This was a throwback activity for me. I did this same activity with my oldest son more than 5 years ago! My current preschooler did just as well with this simple cut & paste activity which basically consists of cutting progressively smaller triangles and then gluing them down from largest to smallest to make a tree. You can see a better picture of how to draw the cutting lines (from only a single sheet of construction paper) here in my original post. Jet was using spring assisted scissors here.


IMG_4640e

Seed Sorting Tray
(Idea from here)

Jet practiced sorting and used his fine-motor skills to operate the tweezers in this seed sorting tray. We had acorns, pine tree seeds, apple seeds, and I put beans into the fourth compartment because I didn’t have any other tree seeds handy. Jet also helped me find all these seeds and put the tray together. It was a great opportunity for observation and discussing some of the things we'd learned in our reading.


IMG_4630e

Leaf Patterning Tray

For this tray I put down 3 strips of tape and made patterns with fabric leaves for my preschooler to finish. The tape allowed me to easily change the patterns from day to day. I used fabric leaves because I didn’t want to confuse my little guy, but real leaves would have been so fun here. Real leaves and a scavenger hunt for the next leaf in the pattern? There’s an activity for another day!


IMG_4637e

Falling Leaves File Folder Game

This next activity isn’t a tray activity, but an actual game. You can play with 1 or 2 players, but reading is required so younger children may need help. This game provides a silly way to practice gross-motor skills, coordination, and balance. You can download it free from Your Therapy Source.


Don’t forget to check out our other tree activities:


Linking up this post at:


Read More: "Tree & Leaf Tot Trays"

Tuesday, April 19, 2016

Tree of Benefits – Ongoing Project

Tree of Benefits

During our tree study we had this Tree of Benefits project ongoing on one wall. It not only gave my boys a chance to display their newfound knowledge, but also provided fine-motor skills practice for my preschooler and kindergartener and spelling practice for my 2nd grader. In case you haven’t noticed, I really love projects where everyone is involved and getting something out of it!


IMG_4554e

This project started off with the boys cutting small rectangles out of green paper and folding them in half.


IMG_4546e

Next the boys cut crescent shapes along the folded edges. (After a little instruction even my 3 year old was able to do this. He used spring-assisted scissors to make it a little easier.)


IMG_4564[1]

When unfolded you have a nice little leaf.

(We also took this opportunity to talk about symmetry and same & different with my younger boys.)


IMG_4549eIMG_4551e

Each time the boys thought of a benefit provided by trees, we listed it on a separate leaf. Either my 2nd grader or I would write the benefit in pencil for my preschooler or kindergartner to trace in marker.


IMG_4557e

And up on the tree each leaf went.

(We happened to have an adhesive tree trunk on hand, but if your mother doesn’t send you these sorts of random things, you could easily cut one out of construction paper or a paper grocery bag. Love you, Nana!)


IMG_4561e2

Here’s a close up of our tree near the end of our unit.


IMG_4562e

The finished product!


Want more? You can check out our other tree projects here:


And don't forget the books!

Here are my Top 3 Book Picks to go along with this project:

IMG_4574[1]

by Janice May Udry

If you’re only going to get one tree book, this is my top pick. It’s a living book and a Caldecott winner, with beautiful illustrations, a sweet innocence to it, and plenty of information. I’m glad to own this one!


IMG_4413[1]

by Shel Silverstein

This is a great book, but it may not be right for every family. It tells the story of the relationship between a tree and a boy over the course of their lifetimes. The tree gives. The boy takes. There’s a great opportunity here for discussion, and plenty of room to insert your own appreciation for the gifts that trees give to all of us.


IMG_4575[1] 

by Clyde Robert Bulla

This book is part of the Let’s Read and Find Out Science Series. These are simple and well-done non-fiction books for kids. They don’t skimp on information, but it’s presented in a very easy to read manner. We own several other books from this series and I’m always quick to grab them at the library when they relate to what we’re studying.
Read More: "Tree of Benefits – Ongoing Project"

Monday, March 14, 2016

Number Tree - Theme Reveal

IMG_3590

To reveal our next theme to the boys, I put together this tray activity one night after they had gone to bed. I hadn’t told them to expect it, but instead just left it for them to find.


IMG_3600[1]IMG_3602

Jet noticed it early the next morning….too early the next morning. Once Spudder was awake I let them get to work on it together. I explained to them that each cup contained a group of legos with numbers on them. It would be the boys job to put the numbers in each cup in order. The catch was that only one cup started at 1. For the other cups the boys would have to pick out the lowest number and then count on from there. This is a skill that’ll not only help the boys get more familiar with numbers, but will be especially beneficial when they’re perfecting their addition & subtraction skills.


IMG_3604

Next they sequenced the rows from largest to smallest. Now they could see where this was headed!


IMG_3605 (2)

The boys with their completed number tree

More TREE fun to come!


Counting On Lego Tree

Linking up this post at:
Read More: "Number Tree - Theme Reveal"

Monday, February 28, 2011

Tot School- Letter of the Week- Letter Tt {Part 2}

D is 32 months.

We had another slow week in Tot School as we finished up our letter T activities. We were in a bit of a recoup & regroup mode as we got over being sick, spent some quality time together as a family, and I worked on getting a bit better organized with my tot school planning. We also let tot school take a back seat to outdoor play as the weather here is now absolutely fabulous! Hopefully I can find more ways to take school outside in the coming weeks.

You can view our first week of letter T activities here.


We spent quite a bit of time playing on our homemade balance beam this week. I'll try to share some more game ideas for this in a future post. But for now we're mostly just playing simple stepping games as in the picture above.


 Dude did an upper/lowercase letter T sort from COAH. I printed the mat from there and then just drew the Ts on scraps of paper so we'd have a few more and to save on ink.


He also did his letter builders. Once we're finished with these, my plan is to put all of these sheets into a notebook for him to play with freely.


Our coloring sheet from last week became a phonics collage when Dude glued on pictures of things that start with letter T. I got the pictures from here and printed them at 50% of normal size.


To try something different I let Dude attempt his first color by number. This one was of a train and is from Making Learning Fun. I think he did pretty well considering.


He covered the letter Ts with erasers on this letter hunt page.


We did a train measuring activity I found at 2 Teaching Mommies. I asked him how long the train was, which numbers it was driving on, & where it started & ended. I'm pretty sure this mostly went right over Dude's head, but I was glad to have introduced the concept and now we have the materials to repeat it again later.


We did this transportation sorting activity that I found at Printable Share. I printed it all at 50% of normal size to save on materials. It's now the perfect size to make into a file folder game, so I plan to do that soon.


We made a number train from Homeschool Creations. After he put the train cars in order (with lots of help) we moved the train forward. I had him move the engine car forward and then slide each number car in behind it as he said the numbers. We did this to help work on 1 to 1 correspondence. Dude still verbally counts faster than he points sometimes when he gets excited.  


Dude got some cutting and sequencing practice doing this tree craft. You can see the full instructions with more pictures and a free printable on my Tree- Cut & Sequence Craft post. 


We also got some wiggles and giggles out indoors playing a Tickle game. We used the Wheel of Tickles printable I found here. I made mine into a spinner using a brad, a scrap piece of plastic and a soda pull tab, but the link describes another method of doing it with some string and a plastic spoon. Just use whatever you've got I say ;)

We made this into a learning experience with the addition of the die. We played by having the Tickler both roll the die and spin the spinner. He then had to start at the far wall and take as many steps as he'd rolled on the die toward the Ticklee. When the steps were complete he could then run to the Ticklee to tickle them on the correct part of the body. My son prefered to be the Tickler, which worked out perfectly. As the Ticklee I also held up my fingers to help remind him of the number of steps we needed to count out. Dude LOVED this game and we played quite a few times! I breifly considered pulling Spudder in to be the Ticklee, but decided I wasn't that brave yet. I'm sure we'll be pulling this one out for some rainy day fun in the future!
 
 
Read More: "Tot School- Letter of the Week- Letter Tt {Part 2}"

Tree- Cut & Sequence Craft

D is 32 months.

We did this tree craft as a part of our letter T week, but I thought I'd put it in a seperate post to give me a little more room to explain this simple craft.

My main goal in putting this together was for my son to be able to practice and gain confidence in his cutting in a fun way.  You only need to be able to cut straight lines to do this and if you instruct your child to cut the lines in the proper order then there are no points where they have to stop. They just cut til they run out of paper.


To start you'll need to draw lines on a piece of construction paper as shown above. I started off by drawing the largest triangle and just letting the paper dictate the triangle sizes. This is really easy once you get started! If this still seems like too much I made up this free printable that you can use.

If your child can cut straight lines they may be able to complete the rest of this activity without help.


Instruct your child to cut along each line. It will be easiest for your child to start with the longest line and continue on with the next smallest line, etc. (basically starting at the upper right hand corner and going clockwise)


You should now have 5 different sizes of triangles. You can play with these by having your child put these in order from smallest to largest or largest to smallest.


When you're ready to move on, have your child glue down the triangles in order from largest to smallest with the largest on the bottom to form a tree.


Decorate as desired. This would probably make a cute Christmas craft,  but since we made ours in February, I just let my son decorate his tree with his normal art supplies. He choose to use his Do A Dot Paints .

Easy as that! And hopefully you've snuck some frustration-free cutting practice!
Read More: "Tree- Cut & Sequence Craft"